Deploy the Abloomify Device Agent via Rippling (macOS MDM Guide)
June 16, 2026
Walter Write
9 min read

Overview
This guide walks you through deploying the Abloomify device agent to Mac devices using Rippling MDM. You will upload a configuration profile that pre-approves the agent's permissions, push the signed and notarized installer as a managed app, scope everything to devices, and verify that the agent is running with no end-user prompts.
The short version is:
- Upload the Abloomify configuration profile (
.mobileconfig) to Rippling as a custom macOS profile. - Deploy the signed installer package as a managed app.
- Scope both to your target devices and verify the install.
macOS only
This guide covers macOS. The Abloomify device agent and these configuration profiles are for Mac. Windows and Chrome telemetry use different deployment paths and are not covered here. For the full reference on what the profiles grant and why, see the central Abloomify device agent deployment guide.
Contents
- Before you begin
- What Abloomify collects (and what it does not)
- Choose Baseline or Full
- Enroll devices with Rippling
- Step 1: Upload the configuration profile
- Step 2: Deploy the installer package
- Step 3: Scope to devices
- Step 4: Verify the installation
- FAQ
- Get help
Before you begin
Make sure you have the following ready:
- A Rippling subscription with device management (MDM) enabled.
- Mac devices already enrolled in Rippling.
- An active Abloomify subscription.
- macOS 14.5 or newer on target devices (the agent's minimum supported version).
- Admin access to both Rippling and your Abloomify console.
- The Abloomify configuration profile (
.mobileconfig) and the signed installer package (.pkg), both available from your Abloomify console or your Abloomify contact.
Note: This method is macOS only. Because of Apple's security controls, the agent does not capture screenshots or record the screen, so there is nothing to grant for screen capture. The configuration profile handles the rest silently when it is pushed through Rippling MDM.
What Abloomify collects (and what it does not)
Abloomify is built privacy-first. It collects high-level app and technology-usage metrics, not the contents of your work. Before you deploy, it helps to know exactly where the line sits.
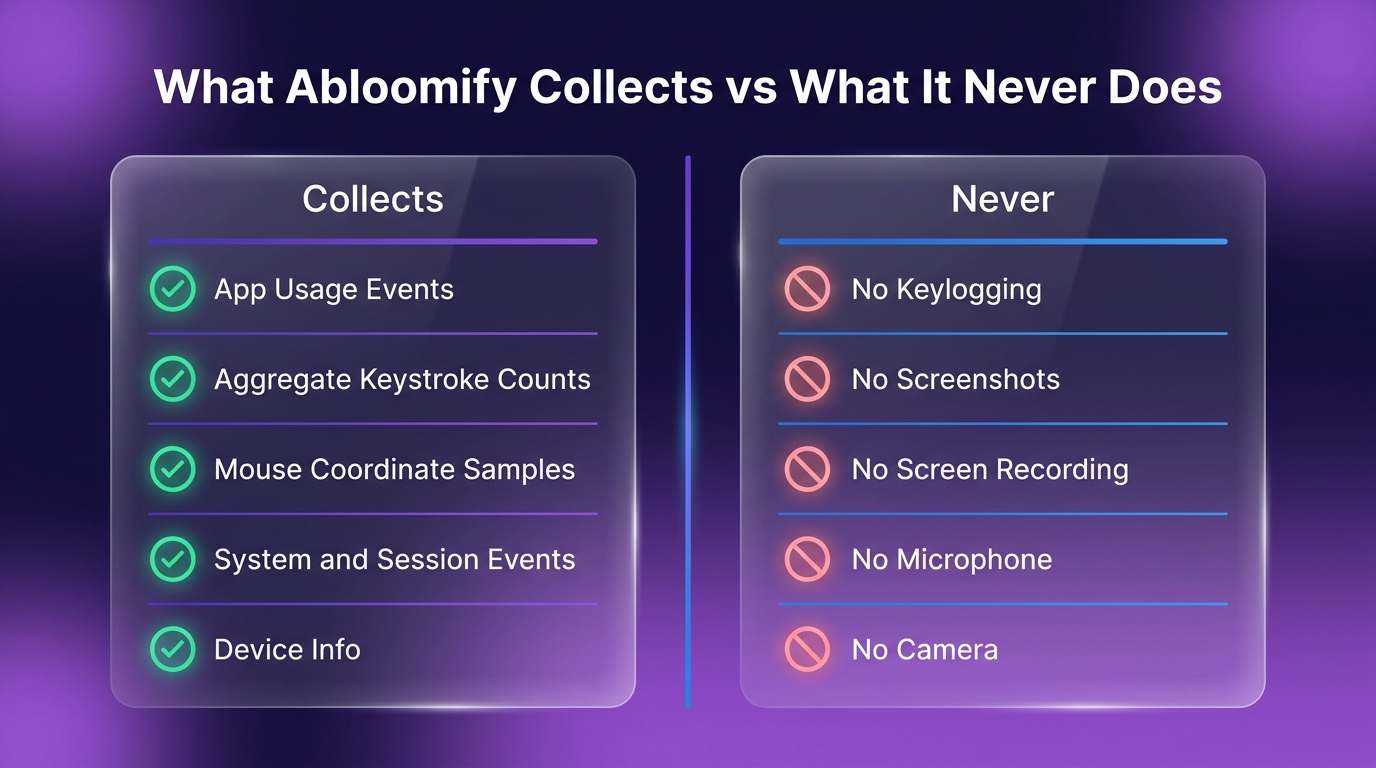
What it does collect:
- App lifecycle and usage events (which app is launched, switched to, or active) by localized name and bundle ID only.
- System and session events such as sleep, wake, and session active.
- An aggregate keystroke count per frontmost app, that is, how many key presses happened in an interval, never which keys.
- Mouse activity as cursor coordinate samples plus the active app name. Window titles are explicitly redacted.
- Basic device info: username, hostname, and OS version.
What it never does:
- No keylogging. There is no event tap or input monitoring. Abloomify reads only the system's aggregate key-down counter, so it records keystroke counts, never what you type.
- No screenshots or screen recording. The agent does not request the Screen Recording permission at all.
- No microphone or camera. There are no audio or video capture APIs and no camera or microphone usage prompts.
Data is uploaded securely to Abloomify using a per-device certificate. For the full breakdown, see the central Abloomify device agent deployment guide.
Choose Baseline or Full
Abloomify ships two device-agent configuration profiles. Deploy exactly one per company, never both. Each profile bundles a PPPC (permissions) payload and a managed login items payload in a single
.mobileconfig.| Profile | What it grants | Deploy when |
|---|---|---|
Baseline (AbloomifyDeviceAgent-Baseline.mobileconfig) | Accessibility (PPPC) + locked managed login items + background-item notification suppression. No Full Disk Access. | Standard monitoring-only deployments. |
Full (AbloomifyDeviceAgent-Full.mobileconfig) | Everything in Baseline plus Full Disk Access (PPPC). | Your company also uses the optional Universal Sync feature. |
Important: Full Disk Access in the Full profile is used only by the opt-in Universal Sync feature, which reads local AI coding-session data (Cursor, Codex, Claude) from disk so it can be added to your knowledge base. It is not used for monitoring. Universal Sync is strictly opt-in and starts with nothing selected. If you are not using Universal Sync, deploy Baseline.
Note: Both profiles must be MDM-pushed through Rippling to take effect silently. A profile that a user simply double-clicks will not auto-grant the permissions. The profile's code requirement pins Abloomify's notarized production build (Apple Developer Team ID
P4RHNGWC67), so only the genuine signed agent matches.Enroll devices with Rippling
Rippling deploys profiles and apps only to devices that are already enrolled in its MDM. If your Macs are not enrolled yet, complete enrollment first using Rippling's own device management documentation, then return here. This guide does not re-document Rippling enrollment.
Step 1: Upload the configuration profile
The configuration profile pre-approves the agent's permissions and locks its background items, so end users are never prompted and cannot disable the agent.
- In Rippling, go to Devices, then open Policies (your macOS device policies).
- Find the macOS library and choose to add a custom profile (custom configuration profile upload).
- Upload the Abloomify
.mobileconfigyou selected in the step above (Baseline or Full). - Level: Keep this set to Computer (device level), not user level.
- Distribution: Set it to Install Automatically so enrolled devices receive it on check-in.
- Save the profile.
Note: The profile includes a managed login items payload that suppresses the macOS "Abloomify can run in the background" notification and prevents users from turning the agent off. This is intentional, and it is also why the agent will not show up in the user's Accessibility list. That is expected and beneficial: it keeps users from accidentally disabling the permissions.
Step 2: Deploy the installer package
Next, push the signed and notarized Abloomify installer as a managed app.
- In Rippling, add a managed app for macOS and upload the Abloomify installer package (
.pkg). - Confirm the app's bundle identifier is
com.abloomify.AbloomifyDeviceAgent. - Set the app to deploy automatically to assigned devices (install on check-in, not user-initiated).
- Save the managed app.
Important: Deploy the configuration profile (Step 1) before or alongside the installer so permissions are already in place when the agent first runs. If the package installs before the profile arrives, the profile will still apply on the next check-in and resolve the permissions silently.
Step 3: Scope to devices
Scope both the configuration profile and the managed app to the same set of devices, not users.
- In each item's assignment or scope settings, target the device group or device list that should receive the agent.
- Confirm the scope is device-based. This is a fleet deployment, so it should follow the Mac, not an individual user account.
- Save your scoping changes.
Note: Deployment can take up to 48 hours to reach every device as machines check in with Rippling. Devices that are online and checking in regularly will receive it sooner.
Step 4: Verify the installation
A successful, silent deployment looks like this:
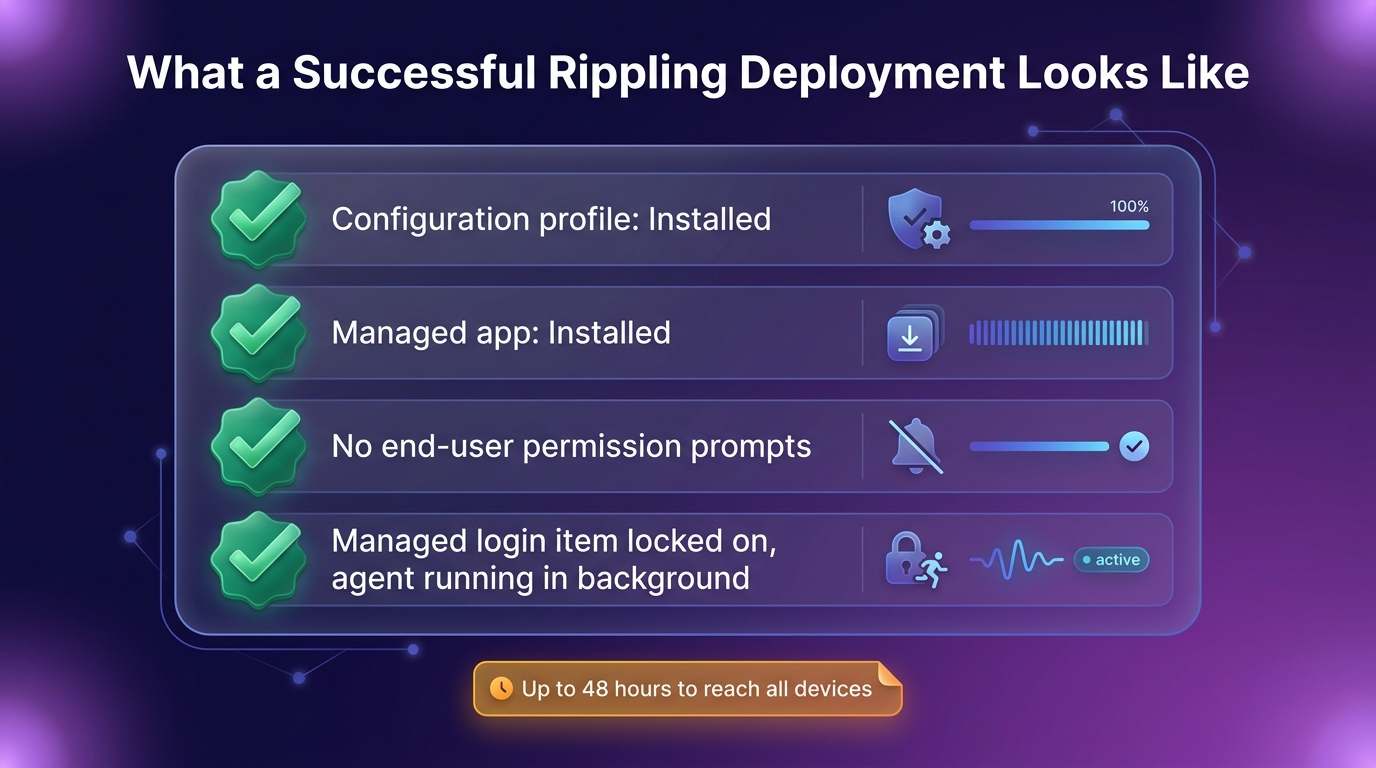
- In Rippling, confirm the configuration profile shows Installed on the target devices.
- Confirm the managed app shows Installed on the same devices.
- On a test Mac, confirm no permission prompts appear to the end user. With the profile applied, permissions are granted silently.
- Confirm the managed login item is locked on, that is, the user cannot disable the Abloomify background item, and no "can run in the background" notification appears.
- Confirm the agent process is running. On a test device, an admin can verify the privileged helper is active in Terminal:
pgrep AbloomifyDeviceAgent && echo "Abloomify agent is running"
Once the profile and app both report Installed and the agent is running with no prompts, the device is fully deployed. Confirm activity is flowing into your Abloomify console.
FAQ
Do I need both the Baseline and Full profiles?
No. Deploy exactly one device-agent profile per company. Use Baseline for standard monitoring. Use Full only if your company also uses the optional Universal Sync feature, which needs Full Disk Access to read local AI coding-session files. Never deploy both.
Will end users see permission prompts or be able to turn the agent off?
No. When the configuration profile is MDM-pushed through Rippling, permissions are pre-approved silently and the managed login items payload locks the agent's background items. Users are not prompted and cannot disable the agent. A profile that is only double-clicked, rather than MDM-pushed, will not auto-grant permissions.
Does the Abloomify agent take screenshots or log keystrokes?
No. The agent does not capture screenshots, record the screen, or log keystrokes. It does not request the Screen Recording permission and has no camera or microphone access. It collects high-level app and technology-usage metrics, including an aggregate keystroke count (how many key presses happened, never which keys).
Why does Full Disk Access appear in the Full profile?
Full Disk Access is granted only in the Full profile and is used only by the opt-in Universal Sync feature to read local AI coding-session data (Cursor, Codex, Claude) for your knowledge base. It is not used for monitoring, and Universal Sync starts with nothing selected until a user opts in.
Why doesn't the Abloomify agent show up in the Accessibility list?
That is intentional. When permissions are granted via the configuration profile (PPPC), the agent does not appear in the user-facing Accessibility list. This prevents users from accidentally disabling the permissions the profile granted.
How long does deployment take?
Deployment can take up to 48 hours as devices check in with Rippling. Devices that are online and checking in frequently receive the profile and app sooner.
Get help
If you get stuck, contact Abloomify support and include which profile you deployed (Baseline or Full), the macOS version on the affected devices, and whether the configuration profile and managed app show as Installed in Rippling. For the full reference on permissions and the two profile variants, see the central Abloomify device agent deployment guide.
Walter Write
Staff Writer
Tech industry analyst and content strategist specializing in AI, productivity management, and workplace innovation. Passionate about helping organizations leverage technology for better team performance.