Deploy the Abloomify Device Agent via Jamf Pro
June 16, 2026
Walter Write
11 min read

This guide walks you through deploying the Abloomify device agent to Mac devices using Jamf Pro. You will push a signed configuration profile to pre-authorize permissions, upload the signed installer package, create a policy to deploy it, and verify the result. Deployment is silent for your end users, and no manual permission prompts are required.
macOS only
This guide covers macOS devices managed by Jamf Pro. The Abloomify device agent described here is the macOS agent. For other platforms, see the central Abloomify device agent guide.
Contents
- What the agent does (and does not do)
- Before you begin
- Choose your profile: Baseline or Full
- Enroll devices with Jamf
- Upload the configuration profile
- Scope the configuration profile
- Download and upload the agent package
- Create a deployment policy
- Set up a Smart Group (recommended)
- Verify installation
- Troubleshooting
- FAQ
- Get help
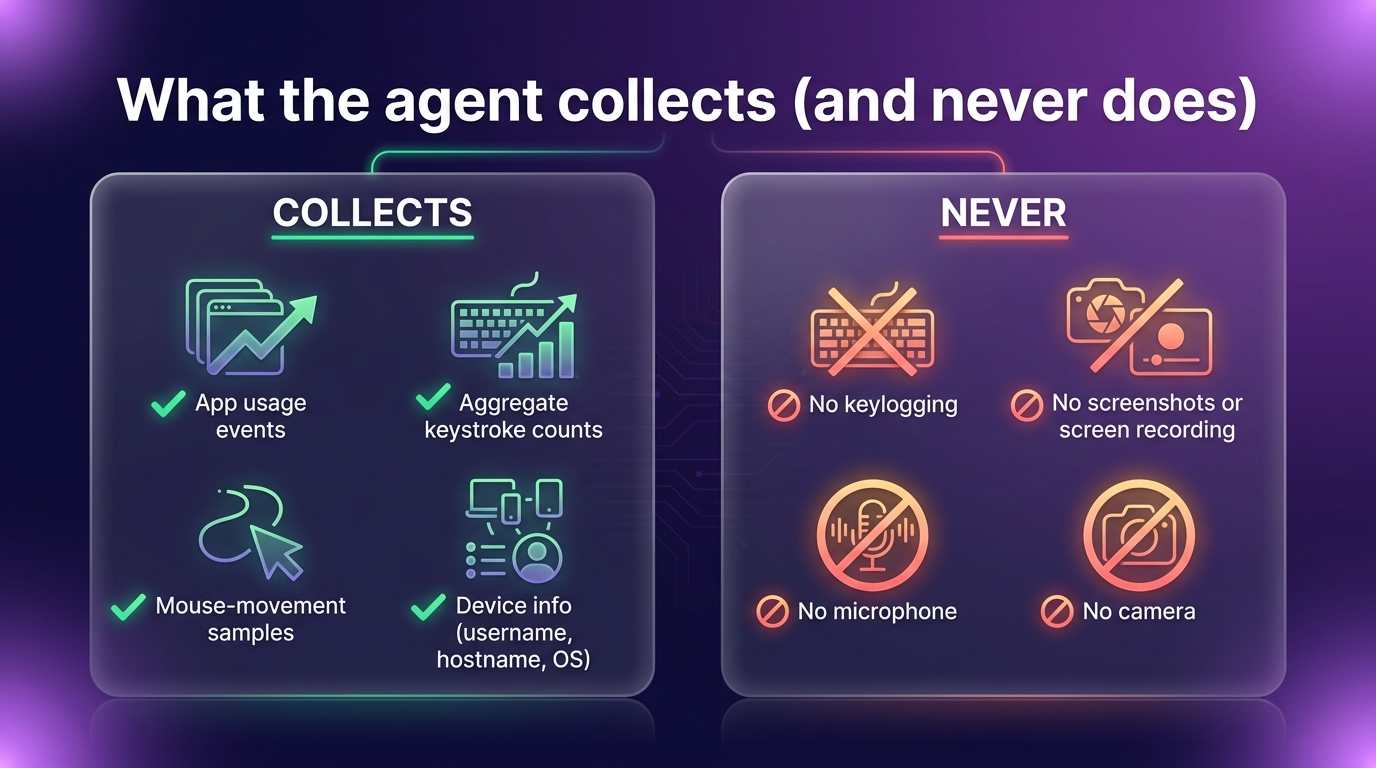
What the agent does (and does not do)
Before you deploy anything to your fleet, it helps to know exactly what the agent collects. Abloomify is privacy-first by design, and we keep that posture verifiable.
The agent does NOT:
- Log keystrokes or capture what you type. There is no keylogger and no input monitoring. The only keyboard signal is an aggregate per-app keystroke count (volume of activity), never the keys themselves.
- Take screenshots or record the screen. The agent never requests the Screen Recording permission, unlike some competitors.
- Access the microphone or camera. There are no audio or video capture APIs in the agent at all.
The agent does collect high-level activity and technology-usage metrics:
- App lifecycle events: which apps launch, switch, and close (app name and bundle ID only, no window titles or content).
- System and session events: sleep, wake, login, power.
- Aggregate keystroke counts and mouse-movement samples as an intensity-of-use signal.
- Basic device info: username, hostname, and OS version.
The agent is signed with a Developer ID Application certificate and notarized by Apple. The configuration profile pins our Apple Developer Team ID (
P4RHNGWC67) so only the genuine, notarized production build is ever trusted.Before you begin
You will need the following:
- A Jamf Pro subscription with administrator access. Jamf Now will not work; Jamf Pro is required.
- Mac devices already enrolled in Jamf.
- A paid Abloomify subscription with admin access to the Abloomify console.
- The Abloomify configuration profile (
.mobileconfig) and the signed agent package (.pkg), both downloaded from the Abloomify console. - macOS 14.5 (Sonoma) or newer on target devices.
Note: This method is macOS only. Because of Apple's security controls, screen-capturing features cannot be silently granted by any MDM. Abloomify does not use screen recording at all, so this is not a limitation for Abloomify deployments. It simply means the agent never asks your users for the Screen Recording permission.
Choose your profile: Baseline or Full
Abloomify ships two profile variants. Deploy exactly one per company. Do not deploy both.
| Profile | Grants | Use it when |
|---|---|---|
| Baseline | Accessibility (precautionary) plus locked managed login items and suppressed background-item notifications. No Full Disk Access. | Standard monitoring-only deployments. This is the right choice for most companies. |
| Full | Everything in Baseline plus Full Disk Access. | Your company also uses the opt-in Universal Sync feature. |
Important: Full Disk Access in the Full profile exists for one reason only: to let the opt-in Universal Sync feature read local AI coding-session data (Cursor, Codex, Claude) from disk. It is never used for monitoring. If you are not using Universal Sync, use the Baseline profile.
Each profile bundles two payloads in a single
.mobileconfig: a PPPC (Privacy Preferences Policy Control) payload that pre-authorizes permissions so end users are never prompted, and a Managed Login Items payload that auto-approves and locks the Abloomify background items. Because the Team ID is locked, the macOS "can run in the background" notification is suppressed and a user cannot disable the agent.Important: The profile must be pushed by Jamf as a configuration profile. A double-clicked profile installed by hand will not auto-grant the PPPC permissions. Only an MDM-delivered profile pre-authorizes TCC.
Enroll devices with Jamf
This guide assumes your Macs are already enrolled in Jamf Pro. If you still need to enroll devices, follow Jamf's own enrollment documentation. Abloomify deployment picks up from an already-managed fleet.
Upload the configuration profile
You upload the Abloomify
.mobileconfig directly into Jamf as a configuration profile.- In Jamf Pro, go to Computers > Configuration Profiles.
- Click Upload (next to the New button).
- Select the Abloomify profile file you downloaded:
AbloomifyDeviceAgent-Baseline.mobileconfigorAbloomifyDeviceAgent-Full.mobileconfig. - Jamf reads the file and pre-fills the General, PPPC, and Managed Login Items payloads. Leave the payload contents as they are; they are already configured correctly and signed.
- On the General payload, set Level: to Computer Level, and set Distribution Method: to Install Automatically.
Note: Do not edit the PPPC payload's app path or code requirement. The code requirement pins the Abloomify Developer ID team, and changing it will break the silent permission grant.

Scope the configuration profile
The profile must reach your devices before the package installs, so that permissions are already authorized when the agent first runs.
- Open the Scope tab of the configuration profile.
- Add the computers or computer groups you are deploying to. Scope to devices, not users.
- Click Save.
Note: Profile delivery happens as each device checks in with Jamf, so allow time for the profile to land. A full rollout can take up to 48 hours as devices check in.
Download and upload the agent package
- In the Abloomify console, download the signed agent package (
.pkg). - Upload the
.pkgto Jamf. If you use Jamf Cloud Distribution Service, upload it under Settings > Computer Management > Packages > New and attach the file. If you use a local or cloud distribution point, upload the package there and let Jamf index it. - Confirm the package appears in Settings > Computer Management > Packages.
The agent installs as a background daemon with the bundle ID
com.abloomify.AbloomifyDeviceAgent. It runs with no Dock icon and no UI, and it starts automatically at login through a managed LaunchAgent.Create a deployment policy
The policy is what actually installs the package on scoped devices.
- Go to Computers > Policies and click New.
- Name the policy something clear, for example
Deploy Abloomify Device Agent. - Under Triggers, select Recurring Check-in.
- Set Execution Frequency to Once per computer.
- Open the Packages payload, click Configure, and add the Abloomify
.pkg. Set the action to Install. - Open the Scope tab and add the same computers or computer groups you scoped the profile to. Scope to devices, not users.
- Click Save.
Important: Make sure the configuration profile is scoped to the same devices as the policy. Permissions come from the profile, and the agent should find them already authorized when the package installs.
Set up a Smart Group (recommended)
A Smart Group lets Jamf detect devices that already have the agent so the policy does not try to reinstall on every check-in. This keeps your fleet clean and your logs quiet.
Create an Extension Attribute
- Go to Settings > Computer Management > Extension Attributes and click New.
- Name it
Abloomify Agent Installed. - Set Data Type to String and Input Type to Script.
- Use a script that checks for the running agent process and echoes a result, for example:
#!/bin/bash
if /usr/bin/pgrep -x "AbloomifyDeviceAgent" >/dev/null 2>&1; then
  echo "<result>Installed</result>"
else
  echo "<result>Not Installed</result>"
fi
- Click Save.
Create a Smart Computer Group
- Go to Computers > Smart Computer Groups and click New.
- Name it
Abloomify Not Installed. - Add a criterion: Abloomify Agent Installed is Not Installed.
- Click Save.
Update your deployment policy
Open the policy from the previous section and change its Scope to the
Abloomify Not Installed Smart Group. Now the policy only targets devices that do not already have the agent running.Verify installation
After devices check in, confirm the deployment succeeded.
- On a target Mac, run a manual check-in from Terminal:
sudo jamf policy
- A successful run downloads, verifies, and installs the package. Expect output similar to:
Checking for policies triggered by "recurring check-in"...
Executing Policy Deploy Abloomify Device Agent
Downloading AbloomifyDeviceAgent.pkg...
Verifying package integrity...
Installing AbloomifyDeviceAgent.pkg...
Successfully installed AbloomifyDeviceAgent.pkg.
- Confirm the agent process is running:
pgrep -x AbloomifyDeviceAgent
- Confirm both the profile and the agent landed. In Jamf, the device's Profiles should list the Abloomify configuration profile as installed.
To confirm that the PPPC permissions were granted by the profile (rather than by a user prompt), you can read the system TCC database. An
auth_value of 2 means the permission was granted:sudo sqlite3 -header -column "/Library/Application Support/com.apple.TCC/TCC.db" \
"SELECT service, client, auth_value FROM access WHERE client LIKE '%abloomify%';"
Note: With the PPPC profile applied, the agent intentionally does not appear in the user-facing Accessibility list in System Settings. This is by design. It prevents users from accidentally disabling a managed permission, and it does not change what the agent collects.
New activity data should begin appearing in the Abloomify console as devices report in. A full rollout can take up to 48 hours as every device completes its check-in.
Troubleshooting
- The package installs but permissions are not granted. The configuration profile was probably not delivered before (or at all). Confirm the profile is scoped to the device and shows as installed in Jamf. Remember that a hand-installed (double-clicked) profile will not grant PPPC; it must be MDM-pushed.
- The installer fails or reports a verification error. The package is likely incomplete or was altered in transit (a verification error means the signature no longer matches the contents). Re-download the signed package from the Abloomify console and re-upload it. The filename does not matter, the signature, notarization, and your company's enrollment config all live inside the
.pkg. - macOS shows a "running in the background" notification. This means the Managed Login Items payload is not applied. Confirm you uploaded the full Abloomify profile (Baseline or Full) and that it is scoped to the device. The payload suppresses that notification and locks the agent on.
- The policy keeps reinstalling on every check-in. Set the policy's Smart Group scope to
Abloomify Not Installedas described above, and confirm the Extension Attribute script reportsInstalledon devices that have the agent. - The profile fails to install with a code-requirement error. Do not edit the PPPC payload. The code requirement pins the Abloomify Developer ID team, and editing it breaks the trust match. Re-upload the unmodified profile.
- Universal Sync has no access to local AI sessions. Universal Sync needs the Full profile, which grants Full Disk Access. If you deployed Baseline, switch your company to the Full profile (deploy exactly one variant).
FAQ
Does the Abloomify agent log keystrokes or take screenshots?
No. The agent does not capture keystrokes, does not take screenshots or record the screen, and does not access the microphone or camera. It records aggregate keystroke counts as an activity-volume signal, never the keys you type, and it never requests the Screen Recording permission.
Why does the profile have to be pushed by Jamf instead of installed by hand?
Apple only honors PPPC (pre-authorized TCC permissions) when the profile is delivered by an MDM. A double-clicked profile will install but will not silently grant permissions, so users would be prompted. Pushing the profile through Jamf is what makes the deployment silent.
Should I use the Baseline or Full profile?
Use Baseline for standard monitoring. Use Full only if your company uses the opt-in Universal Sync feature, which needs Full Disk Access to read local AI coding-session data. Deploy exactly one profile per company, never both.
What is Full Disk Access used for?
Only for the opt-in Universal Sync feature, which reads local AI coding-session files (Cursor, Codex, Claude) that you choose to sync. Full Disk Access is never used for monitoring, and Universal Sync starts with nothing selected until a user opts in.
Can a user disable or remove the agent?
No. The Managed Login Items payload, locked to the Abloomify Developer ID team, keeps the agent enabled and prevents users from turning it off from System Settings. To remove it, unscope the profile and policy in Jamf.
How long does deployment take?
Profiles and policies apply as each device checks in with Jamf. A full rollout can take up to 48 hours for every device to report in.
Get help
Need a hand? Email support@abloomify.com and we will help you get your Jamf deployment running. For the platform-agnostic overview and the canonical permissions reference, see the Abloomify device agent guide.
Walter Write
Staff Writer
Tech industry analyst and content strategist specializing in AI, productivity management, and workplace innovation. Passionate about helping organizations leverage technology for better team performance.