Deploy the Abloomify Device Agent via Microsoft Intune (macOS Guide)
June 16, 2026
Walter Write
10 min read

Quick Setup
This guide walks you through deploying the Abloomify device agent to Mac devices using Microsoft Intune. You upload one configuration profile that pre-authorizes the agent's permissions, deploy the signed installer as a macOS app, assign both to a device group, and verify.
The short version is:
- Add the Abloomify
.mobileconfigas a custom configuration profile in Intune. - Deploy the signed
.pkgas a macOS app (unmanaged line-of-business pkg). - Assign both to your Mac device group and wait for devices to check in.
macOS only
This guide covers macOS devices only. The configuration profile and the steps below are specific to Mac. If you also manage Windows machines through Intune, deploy the Windows agent separately. For the full picture of how the agent works and what it does and does not collect, see the Abloomify device agent deployment guide.
Contents
- What Abloomify collects (and what it does not)
- Before you begin
- Choose your profile: Baseline or Full
- Step 1: Add the configuration profile
- Step 2: Deploy the agent as a macOS app
- Step 3: Assign to a device group
- Step 4: Verify the deployment
- FAQ
- Need help?
What Abloomify collects (and what it does not)
Before you push anything to your fleet, it helps to be clear about what the agent does, so you can answer questions from your team with confidence.
The Abloomify device agent collects high-level app and technology-usage metrics: which applications are active, for how long, and when sessions are active. That is the signal that powers Abloomify's analytics.
It does not do the invasive things people associate with traditional monitoring software:
- No keylogging. There is no keystroke capture and no input monitoring. The agent reads only an aggregate keystroke count per active app (a measure of how busy an app was), never which keys you press or what you type.
- No screenshots or screen recording. The agent does not request the Screen Recording permission at all, and there is no screen-capture code in it.
- No microphone or camera. The agent never requests or uses audio or video capture.
This privacy posture is part of why deployment is simpler than competing tools: because the agent does not capture screen content, you are not asking users to grant Screen Recording, which is the one macOS permission that cannot be granted silently by any MDM. For the deeper technical breakdown, see the device agent deployment guide.
Before you begin
You will need:
- A Microsoft Intune subscription with macOS device management enabled.
- Mac devices already enrolled in Intune (via Apple Business Manager / Automated Device Enrollment, or user enrollment). Intune documents enrollment thoroughly, so this guide does not re-cover it.
- An Abloomify paid subscription and admin access to the Abloomify console.
- macOS 14.5 (Sonoma) or newer on the target Macs. The agent's minimum supported version is macOS 14.5.
- Admin access to both Intune and the Abloomify console.
- The two files you will deploy, downloaded from Abloomify:
- The Abloomify configuration profile (
.mobileconfig). - The signed Abloomify agent installer (
.pkg).
- The Abloomify configuration profile (
Important: The configuration profile must be MDM-pushed to take effect. A profile that a user double-clicks will not silently grant permissions. Pushing it through Intune is exactly what makes the permissions apply without prompting users.
Note: Deployment is not instant. Once assigned, the profile and app land on devices as they check in with Intune, which can take up to 8 hours by default and occasionally longer. Plan for devices to complete over a window, not all at once.
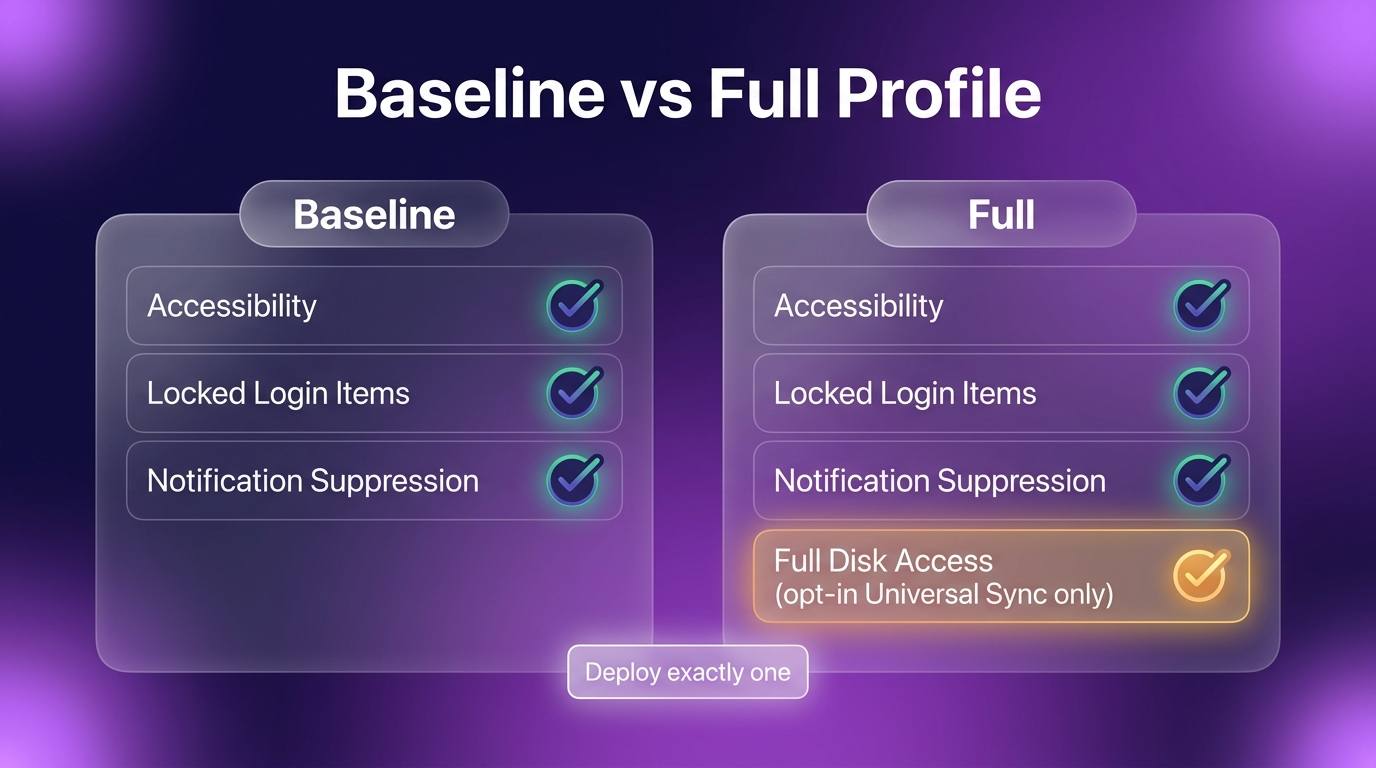
Choose your profile: Baseline or Full
Abloomify ships two device-agent profiles. Deploy exactly one per company, never both.
| Profile | What it grants | Deploy when |
|---|---|---|
Baseline (AbloomifyDeviceAgent-Baseline.mobileconfig) | Accessibility permission plus locked managed login items and background-notification suppression | Standard monitoring-only deployment |
Full (AbloomifyDeviceAgent-Full.mobileconfig) | Everything in Baseline plus Full Disk Access | Your company also uses Universal Sync (syncing local AI coding-session data) |
Each profile bundles two payloads in a single file: a PPPC (Privacy Preferences Policy Control) payload that pre-authorizes the agent's permissions so users are never prompted, and a Managed Login Items payload that auto-approves and locks the agent's background items so the "can run in the background" notification is suppressed and users cannot accidentally disable the agent.
About Full Disk Access: The Full profile grants Full Disk Access for one reason only, the opt-in Universal Sync feature, which reads local AI coding-session files (Cursor, Codex, Claude) when a user chooses to sync them. Full Disk Access is not used for monitoring. If you are not using Universal Sync, deploy the Baseline profile.
Step 1: Add the configuration profile
This profile is what pre-authorizes the agent's permissions and suppresses the background-item notification, so end users never see a permission prompt.
In the Intune admin center, go to Devices > Configuration > Create > New Policy.
- Platform: Select macOS.
- Profile type: Select Templates, then choose Custom.
- Click Create.
- Give the profile a clear Name, for example
Abloomify Device Agent - Baseline. - On the Configuration settings step:
- Custom configuration profile name: Enter a name that will show on devices, for example
Abloomify Device Agent. - Deployment channel: Keep this set to Device channel. The agent's permissions are system-level, so the profile must apply to the device, not the user.
- Configuration profile file: Upload the Abloomify
.mobileconfigyou chose in the previous section (Baseline or Full).
- Custom configuration profile name: Enter a name that will show on devices, for example
- Click Next through Scope tags, then continue to assignments (covered in Step 3).
Important: Upload only one Abloomify device-agent profile. Deploying both the Baseline and Full profiles to the same device causes conflicting PPPC payloads.
Note: The PPPC payload pins Abloomify's production signing identity. This is intentional and beneficial: only the official, notarized Abloomify build matches it, so the permission grant cannot be hijacked by a different binary.
Step 2: Deploy the agent as a macOS app
Next, deploy the actual agent installer. Intune installs an unmanaged
.pkg as a macOS line-of-business app.In the Intune admin center, go to Apps > macOS > Add.
-
App type: Select macOS app (PKG).
-
Click Select app package file and upload the signed Abloomify
.pkg. -
On the App information step, confirm the auto-detected details:
- Name and Publisher (Abloomify) populate from the package. Adjust the display name if you want.
-
On the Requirements step, set the Minimum operating system to macOS 14.5 (the agent's minimum supported version).
-
On the Detection rules step, the bundle identifier auto-populates as
com.abloomify.AbloomifyDeviceAgent. Keep this. Intune uses it so it does not reinstall the agent on devices that already have it.Note: If you want to pin a version, add a CFBundleShortVersionString check matching the agent version you downloaded. Otherwise, the bundle ID alone is enough to detect a successful install. -
Click Next to continue to assignments.
Step 3: Assign to a device group
Assign both the configuration profile from Step 1 and the macOS app from Step 2 to the same device group.
-
For each item (profile and app), open its Assignments step.
-
Under Required, click Add group and select your target device group.Important: Assign to a device group, not a user group. The agent's permissions are device-level and the profile uses the device channel, so user-targeted assignment will not apply them correctly.
-
Save each assignment.
After assignment, devices receive the profile and app as they check in with Intune. The configuration profile and the app should both land on a device before the agent reports its first data, since the profile is what grants the permissions the agent relies on.
Note: Allow up to 8 hours (sometimes longer) for all assigned devices to check in and complete. You do not need to touch the devices; this is fully silent.
Step 4: Verify the deployment
You can confirm a successful deployment from both Intune and the device itself.
In Intune:
- Open the configuration profile you created and check Device status. Target devices should report Succeeded.
- Open the macOS app and check Device install status. Target devices should report Installed.
On a managed Mac (optional spot-check):
Open the System Settings > General > Device Management pane. The Abloomify configuration profile should appear as installed and managed. You can also confirm the agent is running from Terminal:
pgrep -lf AbloomifyDeviceAgent
A successful install returns the running agent process. Because the profile pre-authorized the agent's permissions, you should see no permission prompts on the device, and the agent should begin reporting in the Abloomify console within a short window after install.
Note: With the PPPC profile applied, the Abloomify agent intentionally does not appear in the user-editable Accessibility list in System Settings. This is by design: it prevents users from accidentally toggling off a permission the agent depends on. The managed login-items payload similarly keeps the agent locked on, with no "can run in the background" notification.
FAQ
Do I deploy the Baseline or the Full profile?
Deploy Baseline for standard monitoring-only deployments. Deploy Full only if your company also uses Universal Sync, which needs Full Disk Access to read local AI coding-session files that a user has opted to sync. Never deploy both to the same device.
Does the agent take screenshots or log keystrokes?
No. The agent does not capture screen content, does not record the screen, and does not log keystrokes. It reads an aggregate keystroke count per active app (a busyness signal), never the keys themselves, and it never uses the microphone or camera. See the device agent guide for the full breakdown.
Why does the agent not appear in the Accessibility permissions list?
When permissions are granted via an MDM-pushed PPPC profile, macOS does not list the app in the user-editable permissions UI. This is expected and protects the grant from being changed by accident.
Why does the configuration profile have to be pushed by Intune?
Apple only honors a PPPC permission grant when the profile is delivered by an MDM. A profile installed by double-clicking does not silently grant permissions, so the profile must be assigned through Intune to apply without prompting users.
How long does deployment take?
Devices receive the profile and app as they check in with Intune, which can take up to 8 hours by default and sometimes longer. No user action is required.
Can I deploy this to Windows too?
This guide is macOS-only. The Windows agent is a separate package with its own Intune deployment flow. If you manage both platforms, deploy the macOS profile and pkg here, and handle the Windows agent through its own app deployment.
Need help?
If a device shows the profile or app as failed, or the agent is not reporting after it installs, contact Abloomify at support@abloomify.com with the device's Intune install status and the macOS version, and we will help you sort it out. For background on how the agent works across all MDMs, start with the Abloomify device agent deployment guide.
Walter Write
Staff Writer
Tech industry analyst and content strategist specializing in AI, productivity management, and workplace innovation. Passionate about helping organizations leverage technology for better team performance.